
 9 MIN READ
 UPDATED OCT 30, 2026
How your organization connects its own Airwallex account to Toku and pays bank-transfer (fiat) invoices directly from its Airwallex wallet. Setup takes about 15 minutes: create a scoped API key, create a webhook, then test and save in Toku.
What this integration does
Connecting Airwallex lets your organization pay bank-transfer invoices straight from its own Airwallex wallet. Key properties of the design:
- You keep control of the account. Toku uses a scoped API key that you create in your own Airwallex account, limited to exactly the permissions payouts need - and you can revoke it at any time from the Airwallex web app.
- Verified before saved. Toku tests the credentials against Airwallex live, and the save button stays disabled until a test passes. A bad credential is never persisted.
- Secrets stay secret. The API key and webhook secret are stored encrypted and are never displayed again after saving - leaving a field blank on a later edit keeps the stored value.
- Status stays in sync automatically. An Airwallex webhook notifies Toku as each transfer progresses, so payment statuses update in Toku without anyone checking manually.
Before you start
| Requirement | Details |
|---|---|
| Toku access | A user with the Client Org Admin role. If nobody on your team has it, ask your Toku contact. |
| Airwallex access | An Airwallex user who can create API keys and webhooks (Settings → Developer in the Airwallex web app). |
| A funded Airwallex wallet | Payouts are funded from your wallet balances. Hold the currencies you pay out in - or pick a funding currency in Step 2 to auto-convert from. |
| Production account | Use your live Airwallex account at www.airwallex.com. The Airwallex sandbox (www.sandbox.airwallex.com) is only for testing with a Toku test environment - sandbox credentials will not verify against production. |
Where to find it in Toku: open Admin Integrations → Payment Integrations → Airwallex card, then click Add Airwallex account. This opens the setup window used throughout this guide.
Step 1 - Create a scoped API key in Airwallex
Go to the Airwallex web app → Developer → API keys and click Create new scoped key:
- Production: https://www.airwallex.com/app/developer/org/api-keys
- Sandbox (only when testing with a Toku test environment): https://www.sandbox.airwallex.com/app/developer/org/api-keys
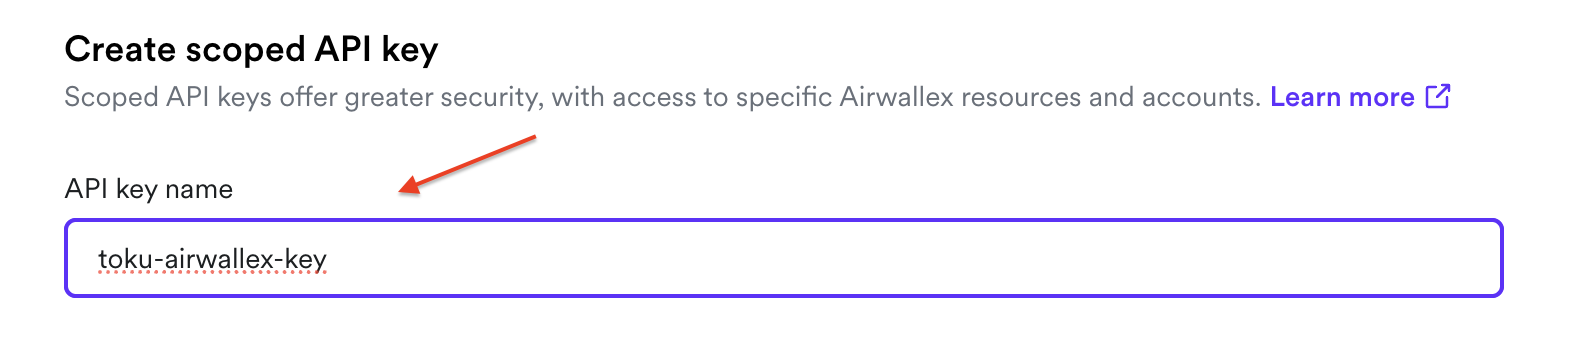
1a. Name the key
Give it a recognizable name, e.g. toku-airwallex-key.
1b. Select the account
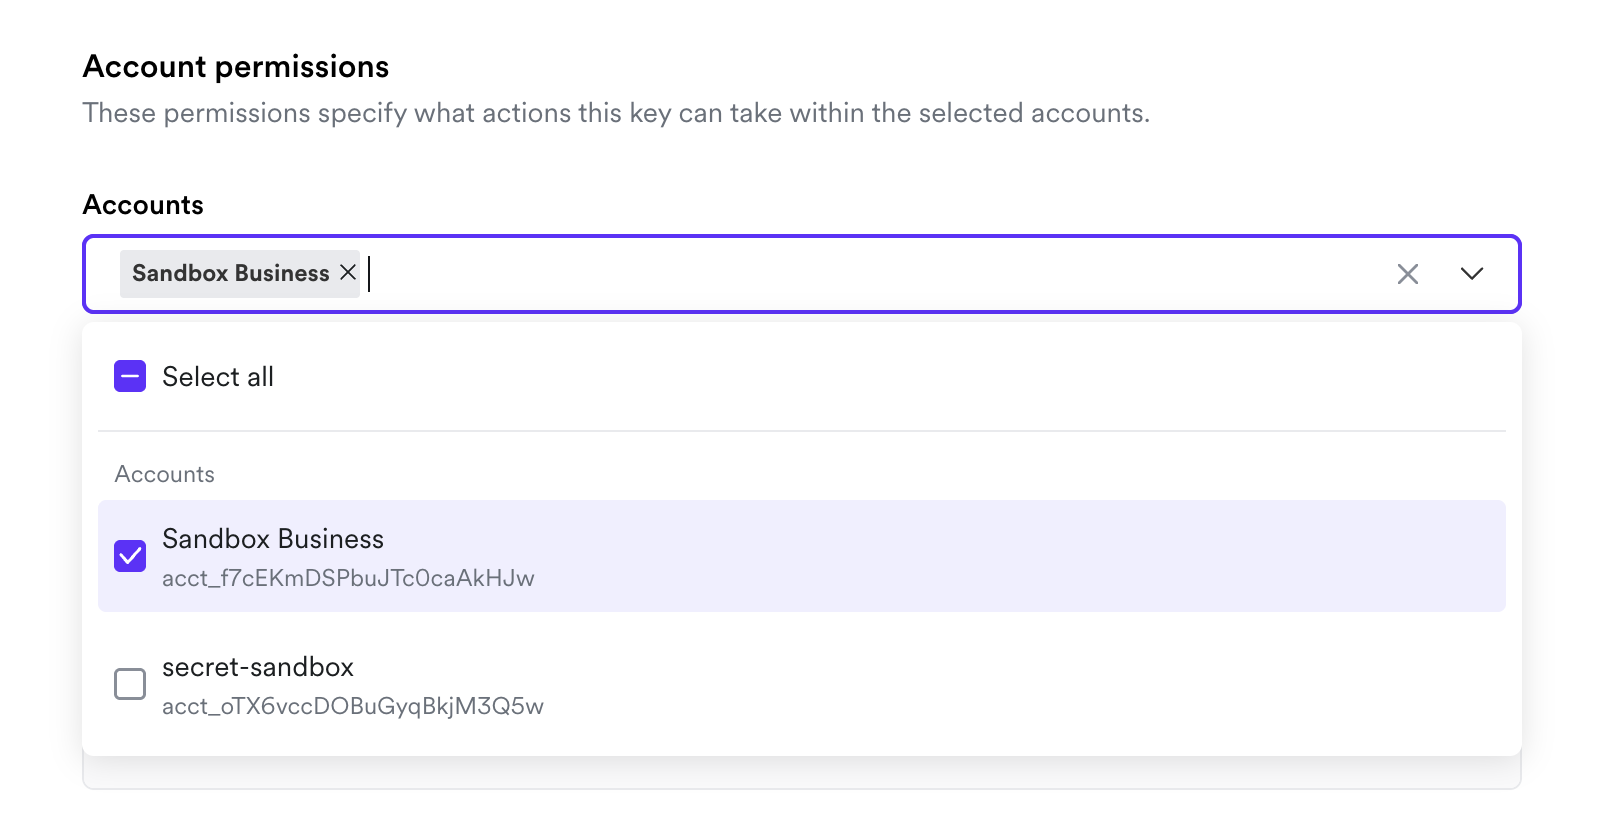
Under Account permissions → Accounts, select the Airwallex account whose wallet should fund payouts.
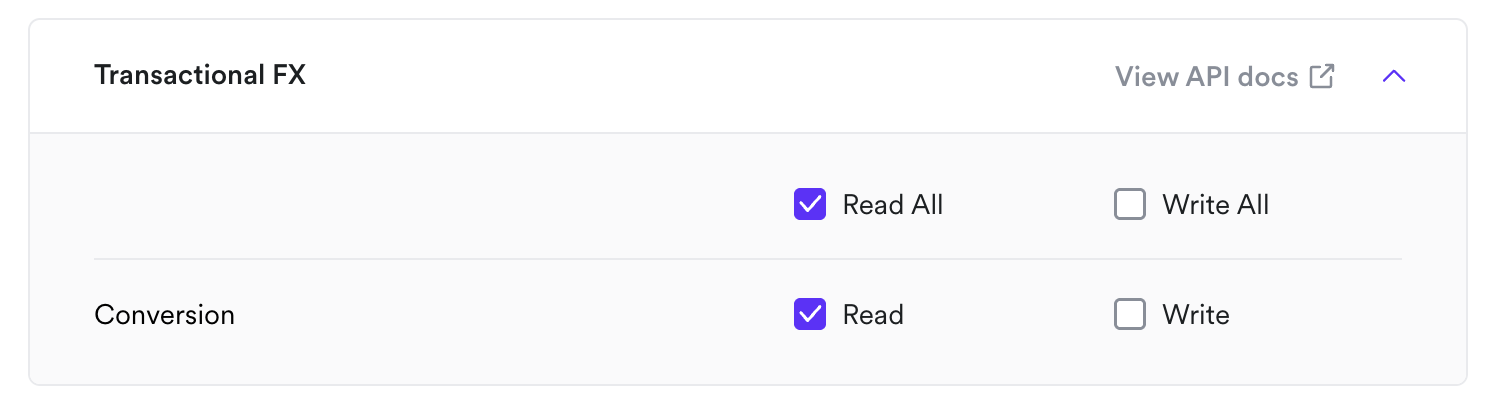
1c. Grant exactly these permissions
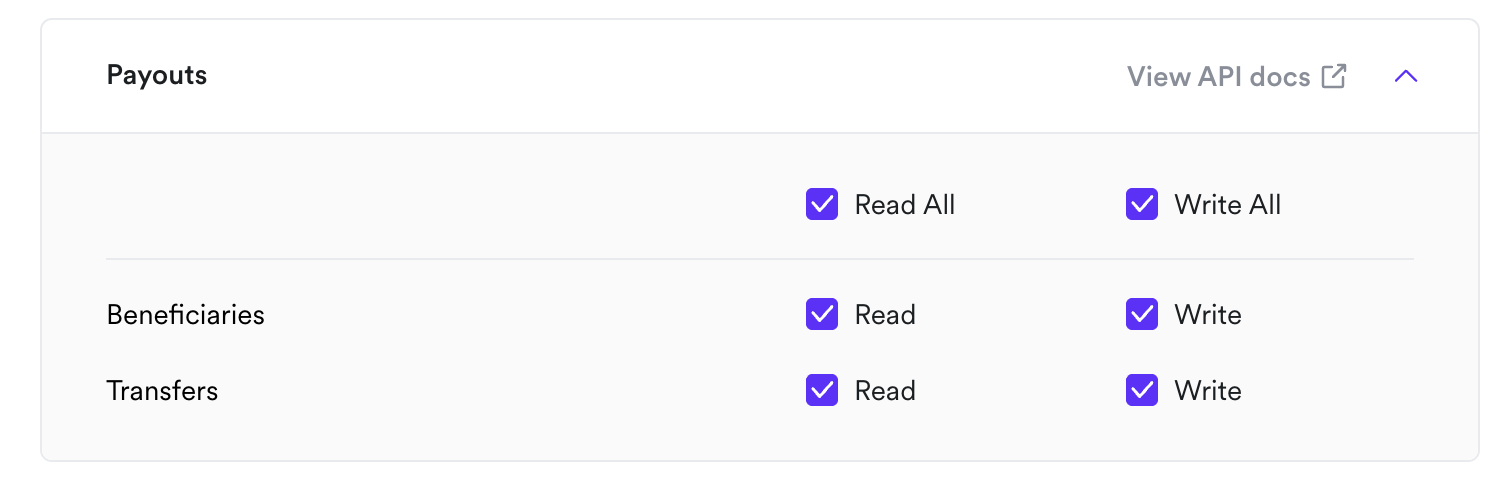
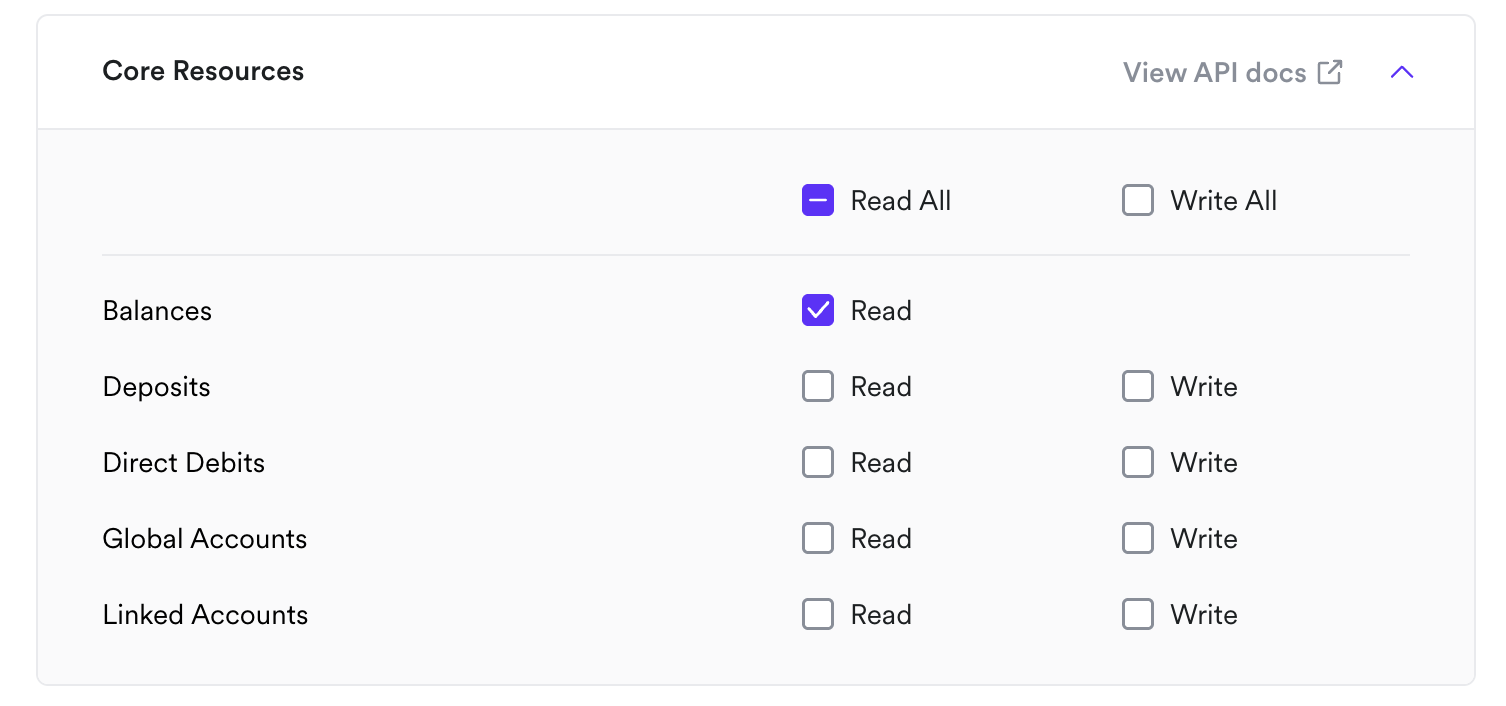
| Section | Resource | Access |
|---|---|---|
| Payouts | Beneficiaries | Read + Write |
| Payouts | Transfers | Read + Write |
| Core Resources | Balances | Read |
| Transactional FX | Conversion | Read |
Everything else can stay unchecked - Toku doesn't need it.
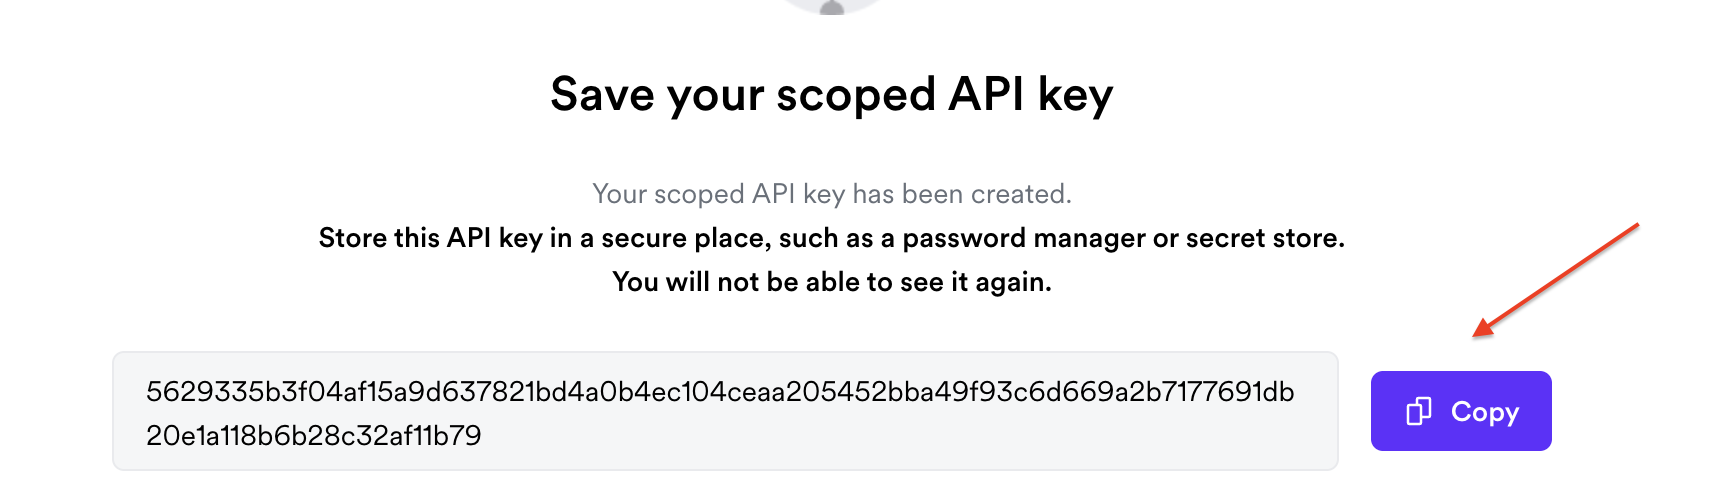
1d. Create the key and copy it immediately
Click Create key. Airwallex shows the API key once — copy it now and keep it somewhere safe until it's pasted into Toku. If you lose it, you'll need to create a new key.
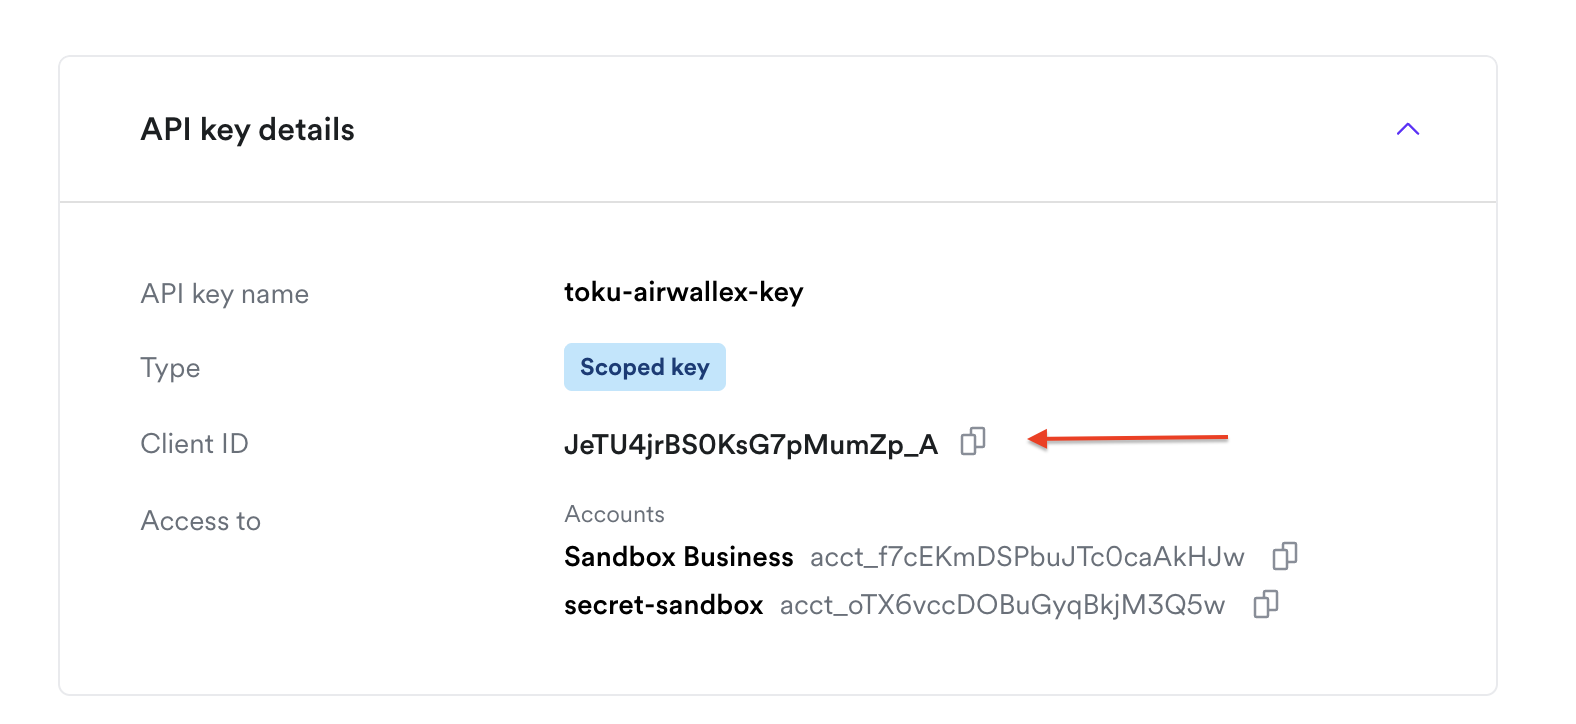
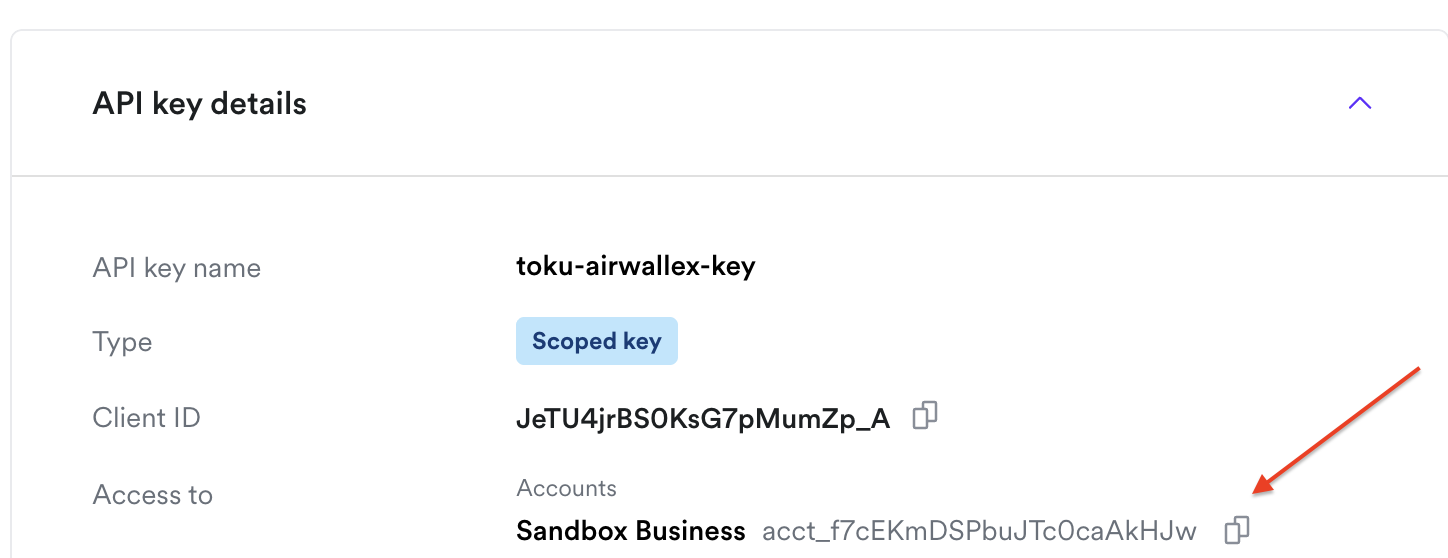
1e. Copy the Client ID and Account ID
Open the key's API key details and copy two more values:
- the Client ID
- the Account ID of the selected account (starts with
acct_)
Step 2 - Enter the credentials in Toku
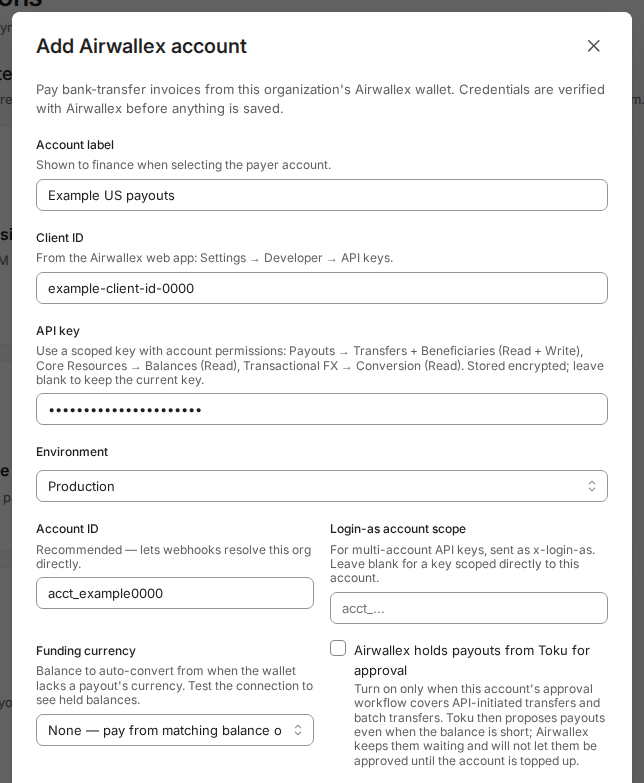
In the Toku Airwallex setup window, fill in:
| Field | What to enter |
|---|---|
| Account label | A name your finance team will recognize when choosing the payer account, e.g. US payouts. |
| Client ID | The Client ID from Step 1e. |
| API key | The scoped API key from Step 1d. Stored encrypted; never shown again after saving. |
| Environment | Production for your live account. (Sandbox is only for tests arranged with Toku.) |
| Account ID | The acct_… ID from Step 1e. Recommended - it lets webhook events resolve to your organization directly. |
| Funding currency | Optional. The wallet balance Airwallex should auto-convert from when your wallet doesn't hold a payout's currency. Leave as "None - pay from matching balance only" to skip auto-conversion. After a successful connection test the dropdown shows your actual held balances. |
| Login-as account scope and Airwallex holds payouts from Toku for approval | Optional. Leave them empty and unticked unless your API key covers several Airwallex accounts, or your Airwallex approval workflow covers API-initiated transfers (see the hint under each field). |
Step 3 - Create the webhook in Airwallex
The webhook is how Airwallex tells Toku a transfer was funded, completed, or failed - without it, payment statuses in Toku won't update.
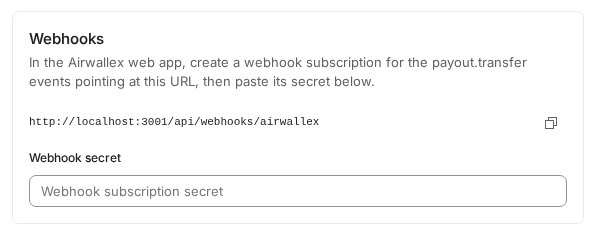
3a. Copy the webhook URL from Toku
The Webhooks box in the Toku setup window shows the URL to use - copy it with the clipboard button. For production this is https://app.toku.com/api/webhooks/airwallex.
3b. Create the webhook
Go to the Airwallex web app → Developer → Webhooks and click Create webhook:
- Production: https://www.airwallex.com/app/developer/org/webhooks
- Sandbox: https://www.sandbox.airwallex.com/app/developer/org/webhooks
Name it (e.g.
toku-airwallex-webhook) and paste the URL from 3a as the Notification URL.

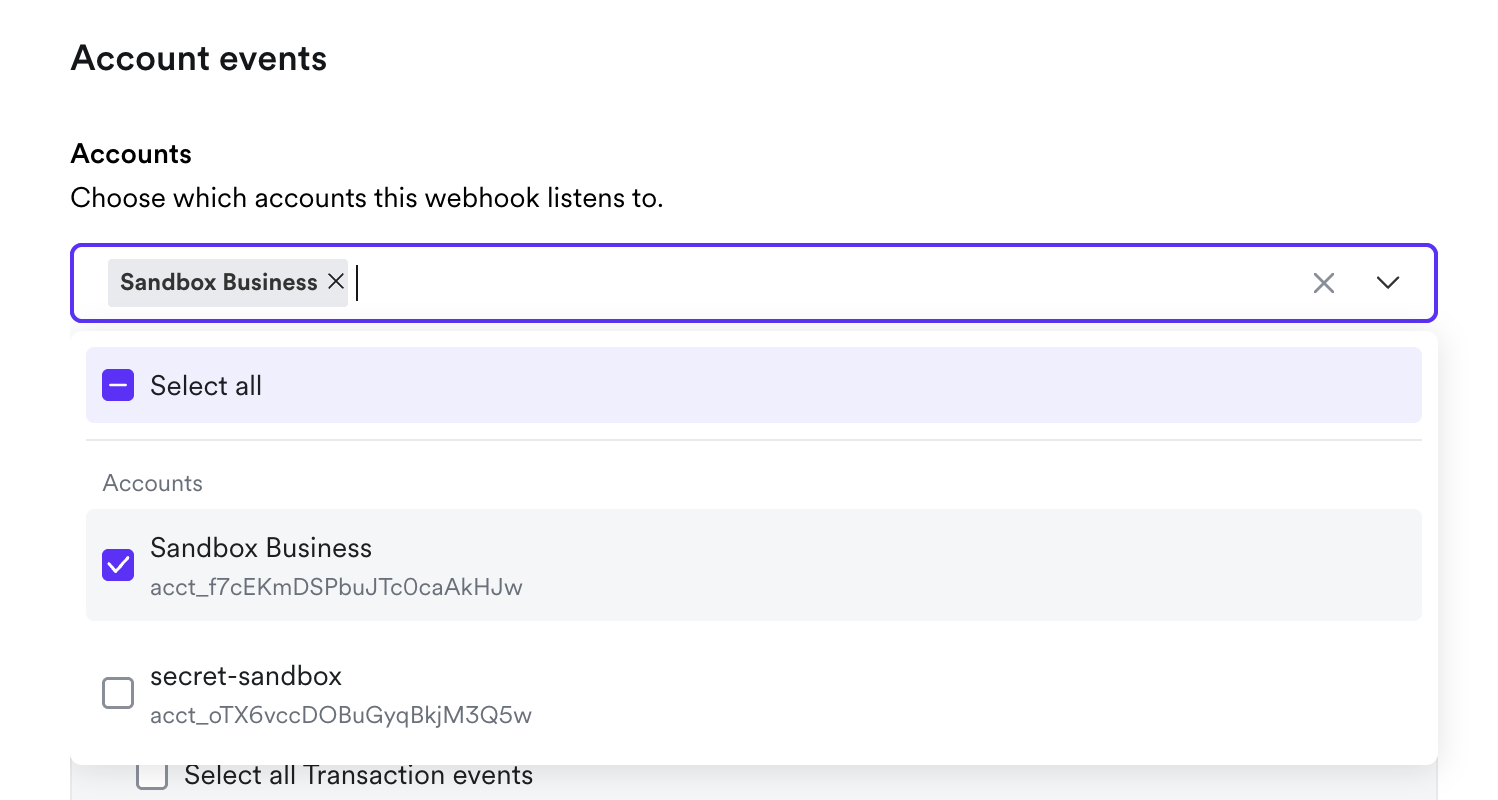
3c. Choose the account
Under Account events → Accounts, select the same account you chose for the API key in Step 1b.
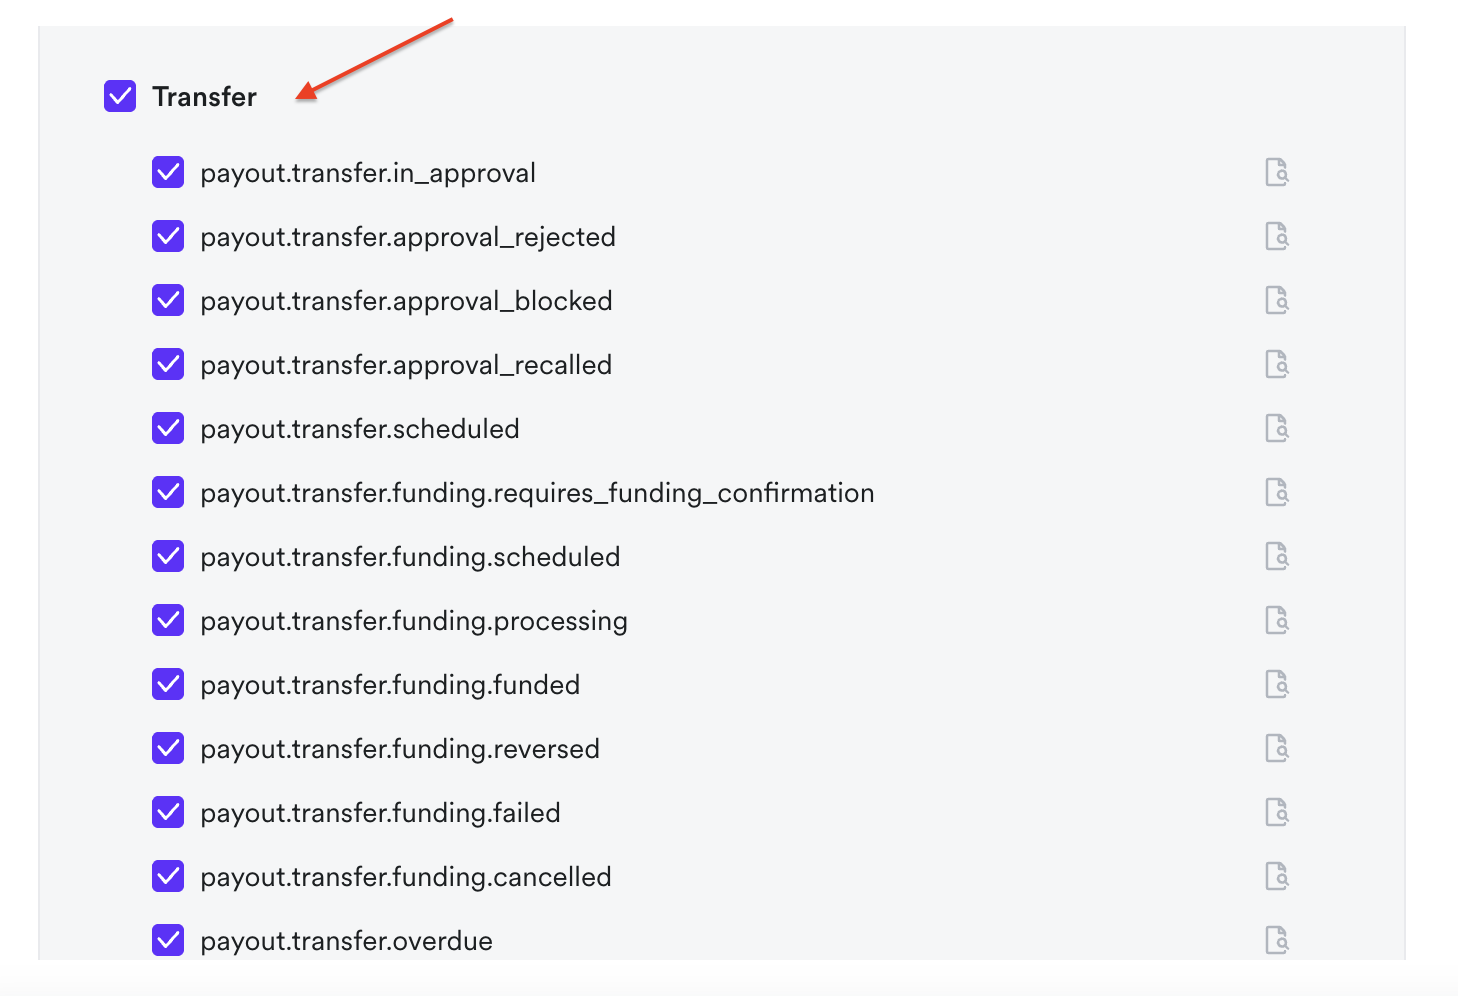
3d. Subscribe to the Transfer events
Tick the whole Transfer group so every payout.transfer.* event is included - approvals, funding, completion, and failure states all matter for keeping Toku in sync.
3e. Copy the webhook secret into Toku
Create the webhook. Airwallex shows the webhook secret (whsec_…) - copy it and paste it into the Webhook secret field in the Toku setup window. Toku uses it to verify that incoming events really come from Airwallex.

Step 4 - Test the connection and save
- In the Toku setup window, click Test connection. Toku authenticates against Airwallex with the credentials in the form; on success a green panel shows the environment and your wallet balances.
- Click Connect Airwallex (or Save changes). Saving re-verifies the credentials one more time and stores everything encrypted - if verification fails, nothing is saved. A few things to know:
- The save button stays disabled until a test passes, and changing the Client ID, API key, or environment invalidates the test - just run it again.
- "Authenticated. No wallet balances yet." on a successful test simply means the wallet is empty - the credentials are fine.
- On later edits, leaving the API key or webhook secret blank keeps the stored value.
Confirm it's live
- [ ] The Airwallex card under Payment Integrations shows Connected, and the setup window badge shows Active with "Webhook secret configured".
- [ ] The connection test showed the wallet balances you expect.
- [ ] Run a small test payout end-to-end before the first real batch - it proves wallet funding, the transfer flow, and the webhook in one go.
How payouts work once connected
- When a bank-transfer invoice is paid, Toku creates the beneficiary and transfer in Airwallex using the scoped key - no manual work in the Airwallex app.
- Transfers are funded from your Airwallex wallet balance in the payout currency. If that balance is missing and you set a funding currency, Airwallex converts from it automatically; with no funding currency set, the payout waits until a matching balance exists.
- As the transfer progresses, Airwallex sends the subscribed webhook events and Toku updates the payment status automatically.
Maintenance: rotation, updates, deletion
| Action | How / effect |
|---|---|
| Rotate the API key | Create a new scoped key in Airwallex (Step 1), paste it into Toku, Test connection, then save. The old key can then be deleted in Airwallex. |
| Replace the webhook secret | Create a new webhook (or rotate the secret) in Airwallex, paste the new secret into Toku, and save. |
| Edit other settings | Account ID and funding currency can be changed any time - a re-test is only needed when the Client ID, API key, or environment changes. |
| Delete account | Permanently removes the Client ID, API key, and webhook secret from Toku; bank-transfer invoices can't be paid until it's set up again. Deletion is refused while any transfer is still in flight — wait for them to settle or fail first. |
Troubleshooting
| Symptom | Likely cause → fix |
|---|---|
| “Airwallex rejected the credentials” on test or save | Client ID and API key don't match, the key was revoked or re-created, or the environment doesn't match the account (sandbox key with Production selected, or vice versa). |
| The save button stays disabled | The current credentials haven't passed a test yet - any change to Client ID, API key, or environment requires clicking Test connection again. |
| Test succeeds but shows “No wallet balances yet” | The wallet is empty. Fund it before running payouts. |
| A payout doesn't start because of a missing currency | The wallet doesn't hold the payout currency - top it up, or set a funding currency in Step 2 so Airwallex auto-converts. |
| Payment statuses in Toku stop updating | The webhook is missing or misconfigured - check the webhook exists, points at the exact URL from Step 3a, covers the right account and the full Transfer event group, and that the secret in Toku matches. Setting the Account ID in Step 2 also helps events resolve to your organization. |
| “Delete failed … transfers still in flight” | Airwallex is still processing transfers. Wait for them to settle or fail, then delete. |
Questions or a step that doesn't match what you see? Contact your Toku account manager or support - we're happy to walk through the setup together.