
 7 MIN READ
 UPDATED OCT 30, 2026
Fordefi Payment Integration
📘 For organization administrators on Toku Stablecoin Payroll. Last updated October 30, 2026.
Use this guide to connect your Fordefi workspace to Toku Stablecoin Payroll: generate a signing key in Toku, register the API user in Fordefi, verify the token, link a payout vault, and enable payouts.
What you'll need
- A Fordefi workspace with permission to create API users, and admin approvers who can act on the request in the Fordefi mobile app
- An admin user on your Toku Stablecoin Payroll account
- Your organization's approved IP settings for Fordefi network access
- An active EVM or Solana vault in Fordefi, or permission to create one
💡 Where each step happens: steps 1, 2 and 5 - 8 are in Toku, under Admin Integrations → Payment Integrations → Fordefi. Steps 3 and 4 are in Fordefi's web console and mobile app. Deploying and activating the Fordefi API Signer happens separately in your own Fordefi environment - Toku does not perform or verify it.
Overview of the steps
- Generate the request-signing key in Toku and copy the public key
- Register an API user in Fordefi with that public key, then retrieve the access token
- Save and verify the token in Toku, and choose how payouts will be signed
- Link a payout vault and enable payouts
- Confirm the three status rows
Step 1 - Open the integration
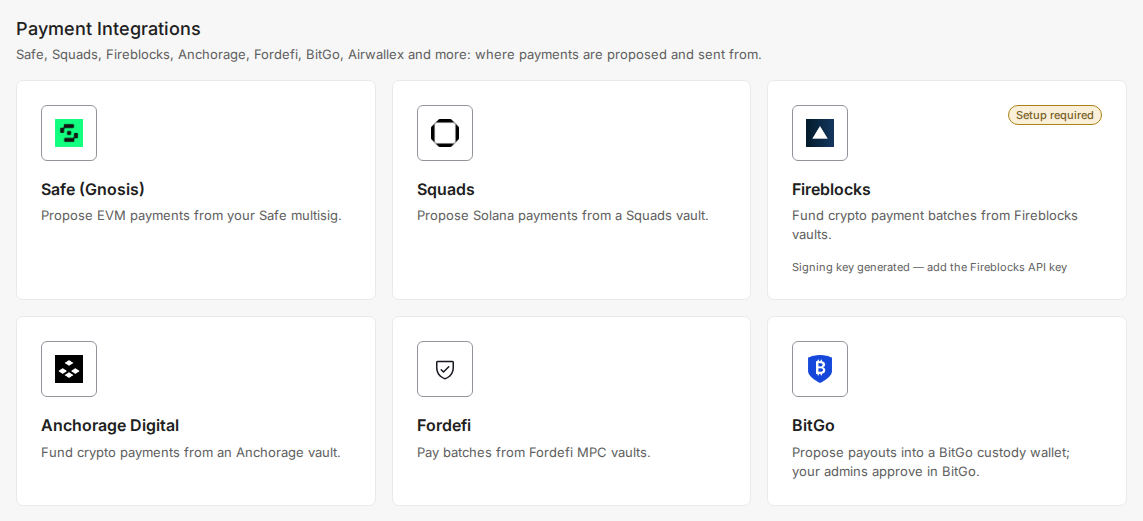
In Toku, go to Admin Integrations → Payment Integrations, then select the Fordefi card. It opens the Fordefi Integration window.
Step 2 - Generate the request-signing key
Keep the Toku configuration window open while you register the key in Fordefi.
- Under 1. Request-signing key, select Generate signing key.
- Once generation completes, select Copy public key or Download public key.
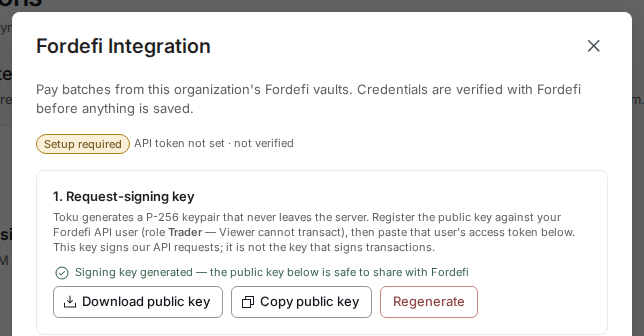
Toku generates a P-256 keypair and keeps the private key. You do not need to generate or upload a separate private key. Use this public key when setting up the Fordefi API user in the next step.
💡 If a key already exists, copy or download the existing public key. Regenerate replaces the key - you would then have to register the new public key in Fordefi and verify the token again.
Step 3 - Register the API user in Fordefi
Fordefi instructions: Create an API user. Follow them alongside these steps.
- In the Fordefi console, open User Management → API Users and add an API user.
- Enter a name, choose the Trader role, optionally assign groups, and continue through the network-access screen using your organization's approved IP settings.
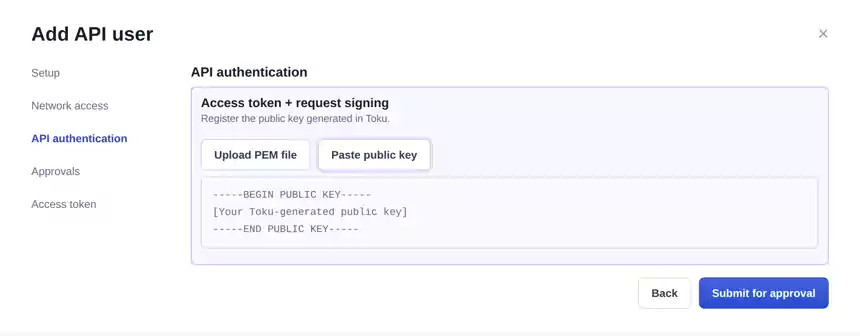
- On the API authentication screen, choose request-signing authentication, then Upload PEM file or Paste public key using the public key from step 2. Use the keypair already generated in Toku - no separate key generation is needed.
- Select Submit for approval and wait for the admin quorum. Approvers act in the Fordefi mobile app under Management → Pending.
Step 4 - Retrieve the access token in Fordefi
After approval, retrieve and view the access token. Copy it to approved secure storage before confirming that it is saved - Fordefi hides the token after that confirmation.
Then return to Toku and continue in the Fordefi Integration window.
Step 5 - Save and verify the API token in Toku
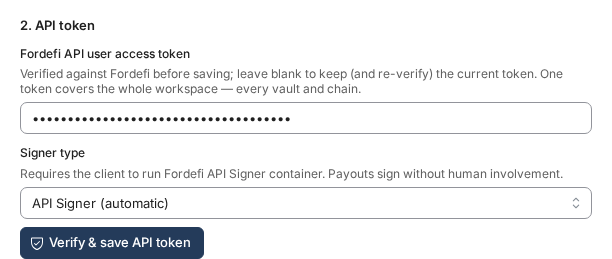
- Under 2. API token, paste the token into Fordefi API user access token.
- Choose the appropriate Signer type.
- Select Verify & save API token.
| Signer type | Use when |
|---|---|
| API Signer (automatic) | Your team operates Fordefi's API Signer and has activated and paired it with this API user. Payouts sign without human involvement. |
| Initiator (human approves in Fordefi) | A person will approve each payout in the Fordefi app. |
After saving, the action becomes Verify & save changes. Leave the token field blank to retain and re-verify the saved token. Verification confirms a vault read; it does not verify signer health or transaction approvals.
💡 If you chose API Signer (automatic): your Fordefi operator deploys, activates and pairs the signer outside Toku, using the same public key from step 2. The signer registration menu expects the key body on one line, without PEM headers. Follow Fordefi's references for deploying and activating the API Signer and for pairing the API user and signer.
Step 6 - Link a payout vault
Create or select the payout vault before trying to link it.
- Under 3. Payout vaults, choose a vault from the dropdown.
- Select Link vault, then confirm it appears in the linked-vault list.
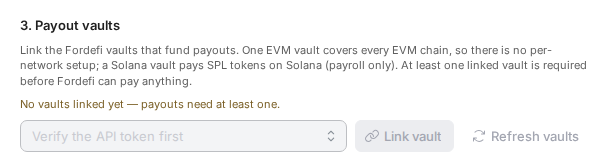
An EVM vault covers EVM networks; a Solana vault is used for Solana payroll.
If no vault is available, open Vaults in the Fordefi console and create an active EVM or Solana vault, or give the API user access to an existing one. This is Fordefi workspace setup, separate from linking a vault in Toku. Then return to Toku, select Refresh vaults, and link the vault. If the selector says "All vaults are linked," check the existing linked-vault list.
Step 7 - Enable payouts
Select Enable beside Payouts disabled. Confirm the label changes to Payouts enabled, then select Close. Toku refreshes the overview automatically.
⚠️ Before payroll runs, arrange funding of the Fordefi vault for the payout asset and the required network fees. Toku's Link vault action does not move funds or verify balances.
Step 8 - Confirm the result
| Status row | Expected result | What Toku checks |
|---|---|---|
| Connection | Verified | A signing key exists and the saved API token has been verified. |
| Payout availability | Enabled | New payouts are available in Toku and your integration is enabled. |
| Payout configuration | Configured | At least one vault is linked and a supported payout route exists. |
When these checks pass, the integration badge reads Active. That describes the configuration only - it does not confirm signer health, available funds, or completion of a payment.
If the page needs attention
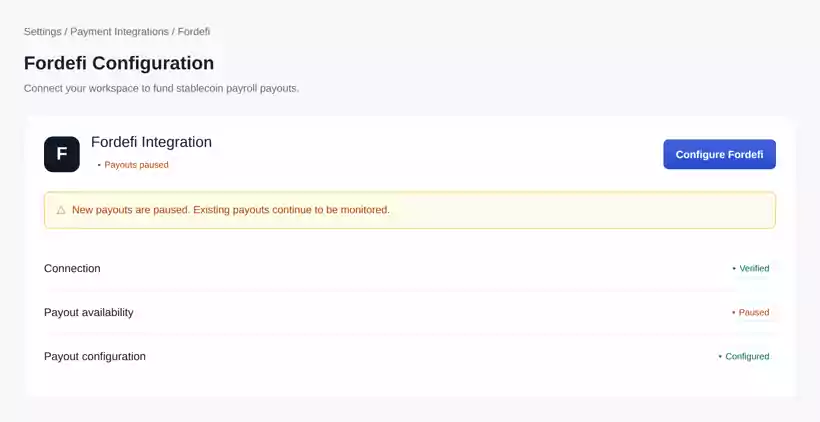
- Payouts paused, with the yellow notice. Toku has paused new Fordefi payouts. Existing payouts continue to be monitored. Contact Toku support to restore availability - changing the API token does not remove this pause.
- Paused without the notice. Check the integration's Enable control.
- Connection - Action required. Reopen the Fordefi Integration window and verify the key and token.
- Payout configuration - Action required. Confirm a linked vault and a supported payroll route. Contact Toku support if it persists.
Good to know
- The request-signing key authenticates Toku's API requests. The Fordefi API Signer is a separate component that signs transactions when automatic signing is selected.
- Screens in this guide are illustrative and use sample data.
- Using a different custody provider? See Toku: Fireblocks Stablecoin Payroll Integration Guide.
Still stuck?
You can email customer-success@toku.com to reach our support team. Please include your email address, organization name, and a description of what happened. Screenshots and videos are always welcome to speed up the troubleshooting process. Feel free to reach out any time for further assistance.