
 11 MIN READ
 UPDATED OCT 30, 2026
📘 Audience: new employees · Customer-facing · Last updated 2026-10-30 for the move to app.toku.com.
This guide is for new employees whose organization pays them through Toku and who have been invited to finish their employment setup. By the end you will have completed every onboarding step - personal details, emergency contact, work authorization, tax details, identity documents, employment agreement, banking, and benefits - and submitted everything for review, so your organization and Toku can finish setting up your employment.
Before you start
Have these ready before you begin. Most people finish in 20 - 30 minutes.
- Your invitation. Your organization adds you to Toku first. You receive a welcome email with a link to create your password. If you have not received it, check your spam folder or ask your HR contact to resend it.
- Your login details. The email address your organization registered for you, and the password you created from the invitation email.
- The sign-in page. Type
app.toku.cominto your browser's address bar. This replacedtga.app.toku.comin August 2026, and there are no product tabs to pick any more. - Personal details. Your legal name exactly as it appears on your government-issued ID, date of birth, home address, and phone number.
- Tax and identity details (United States). Your Social Security Number and a government identity document you can photograph or scan - for example a US Passport, or a Driver's License plus Social Security Card. Files must be PDF, PNG, or JPEG and under 10 MB.
- Bank details. Your bank's 9-digit routing number and your account number, for direct deposit.
- An emergency contact. Their name, relationship to you, and phone number.
- Time to finish in one sitting. Each step is saved when you select Save & Continue, but anything typed into a step you have not saved yet is lost if your session sits idle too long and signs you out. If that happens, log in again - every step you already saved is still there.
The onboarding steps, one by one
The wizard has 10 steps for employees in the United States. The exact list can vary slightly by country and by what your organization offers. A blue check mark appears next to each step you finish, and the percentage at the top of the checklist increases.
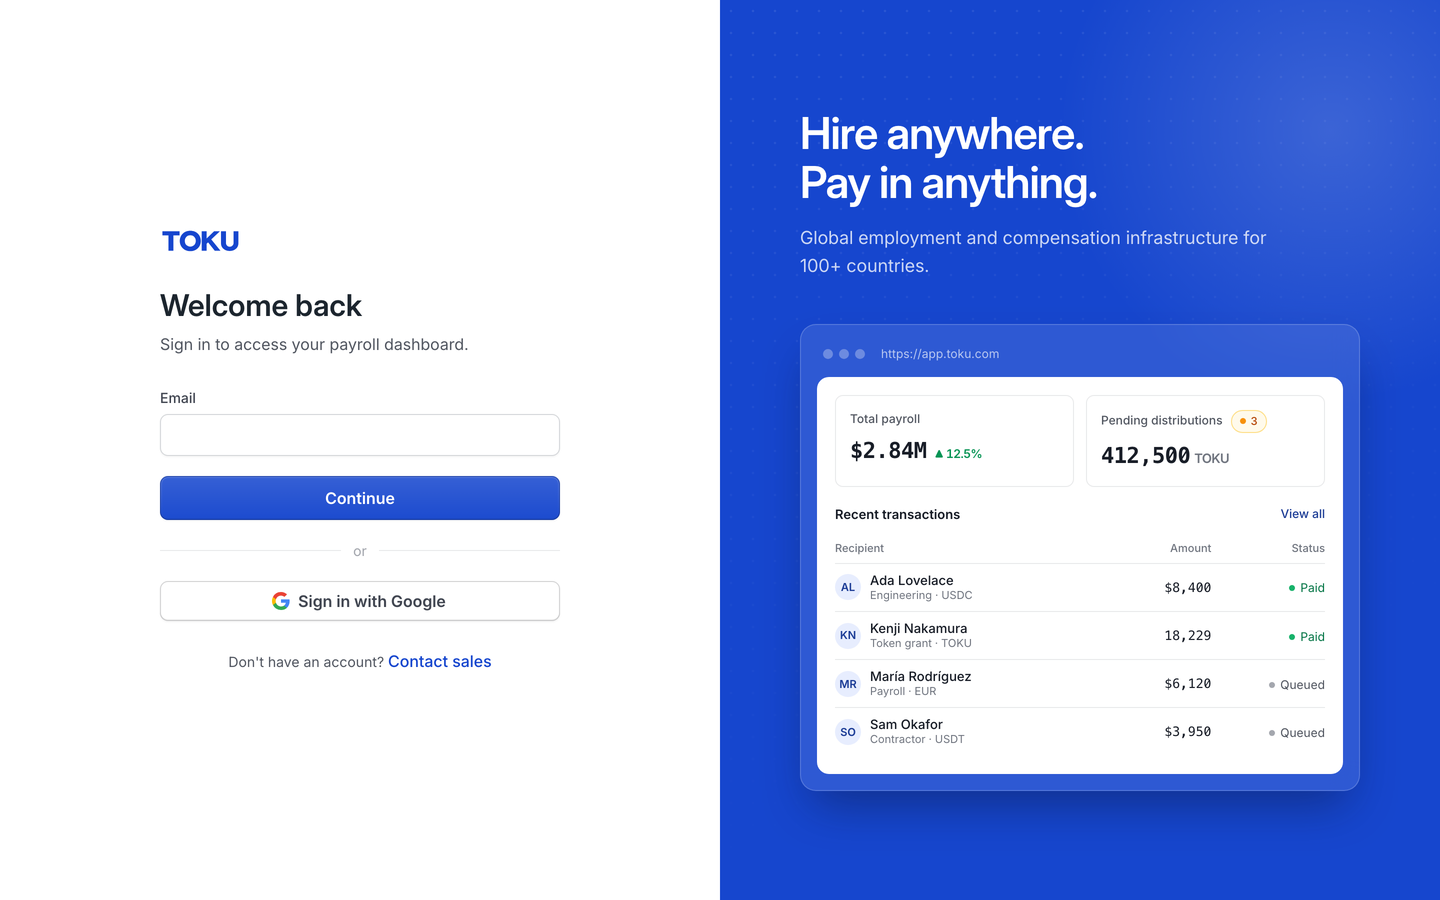
Step 1. In your browser, go to app.toku.com. You see a page headed Welcome back with a single Email box. There are no Token Grants / Stablecoin Payroll / Employment tabs any more - Toku takes you to the right product after you sign in. If you do see three tabs, you have landed on an old cached page or bookmark: retype the address in full.
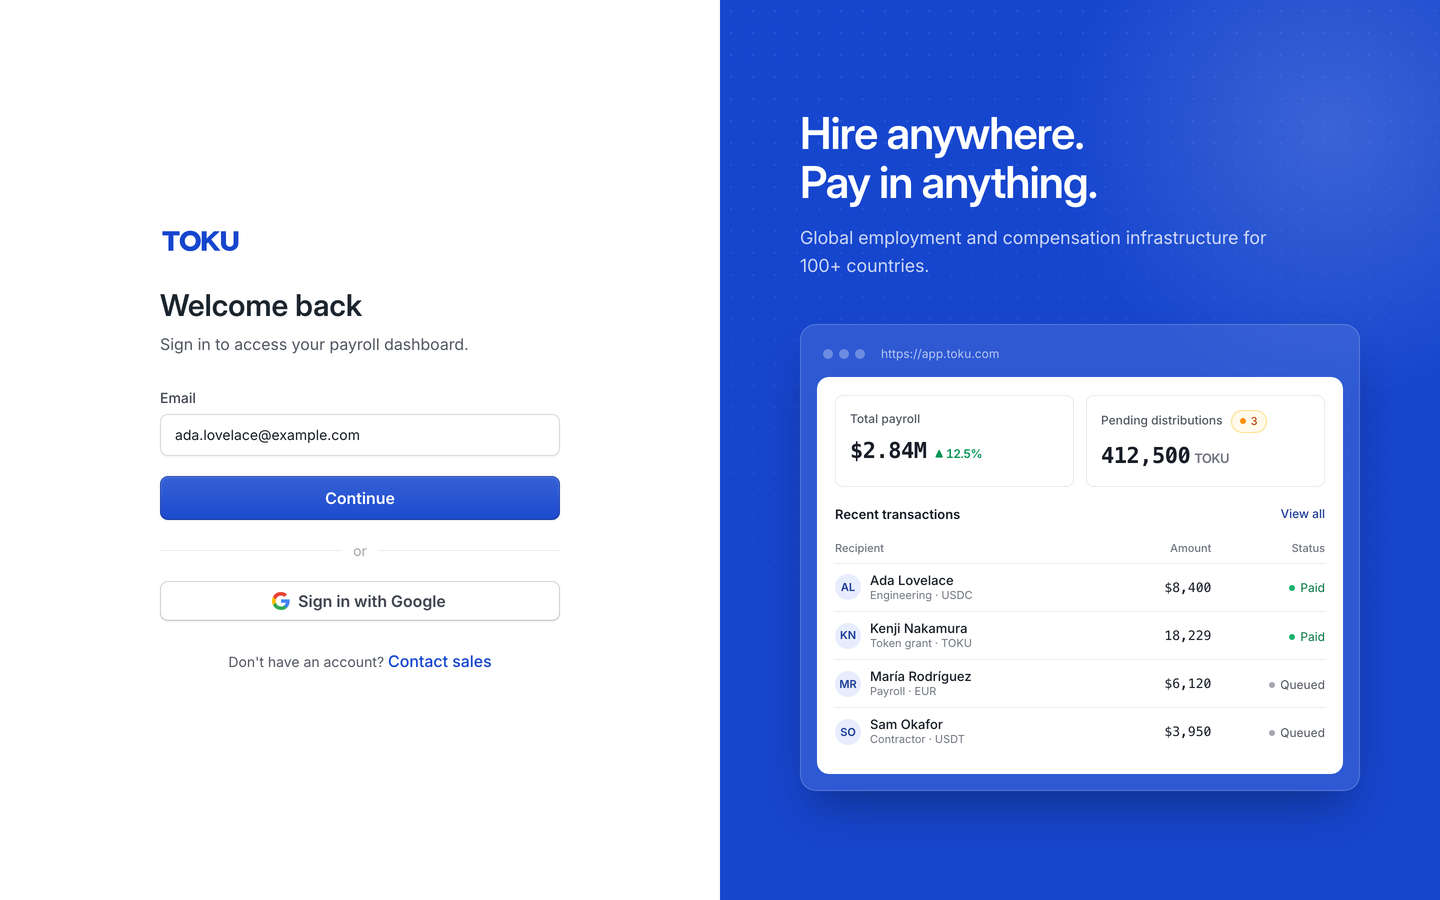
Step 2. Type your work email address into the Email box and select Continue. The page then asks for your password: type it and select the blue Sign in button. Success looks like a page headed "Welcome, !" with a checklist. If sign-in is refused, re-type your email and password carefully, or select Forgot password? to reset. (You can also use Sign in with Google, or ask Toku to email you a one-time sign-in link, instead of typing a password.)
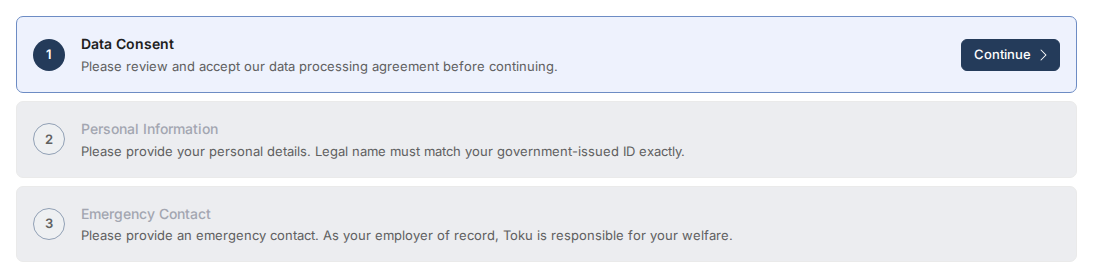
Step 3. You land on the onboarding checklist, titled "Complete your account setup", showing "0 of 10 steps complete". Only the current step is active - later steps are greyed out until you reach them. Select the blue Continue button on the right of step 1, Data Consent.
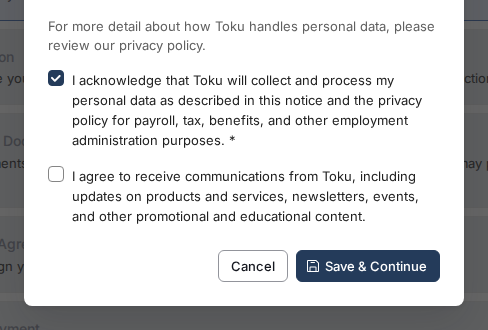
Step 4. A window titled Data Processing Notice opens. It explains what personal data Toku collects and why. Read it, then tick the first box - "I acknowledge that Toku will collect and process my personal data…". This box is required (marked with *). The second box, about receiving product updates and newsletters, is optional - leaving it unticked does not block you.
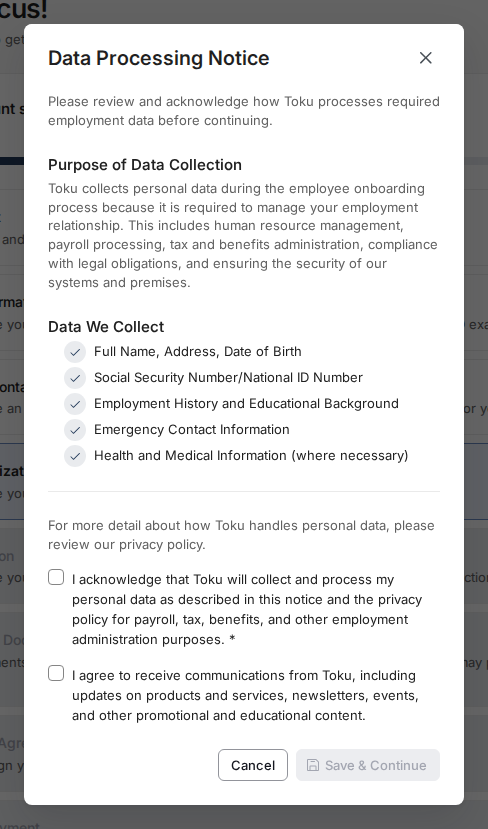
Step 5. Select Save & Continue at the bottom right of the window. The button is greyed out until the required box is ticked. Success looks like the window closing and the checklist showing "10%" and "1 of 10 steps complete".
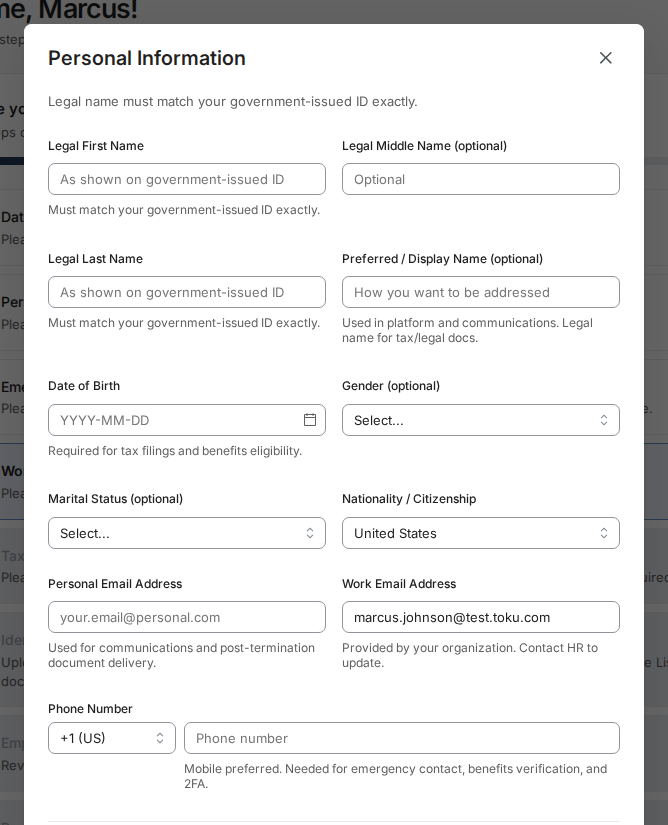
Step 6. The Personal Information window opens next. Your legal first and last name may already be filled in by your organization - check them against your government-issued ID and correct them if they differ, because your legal name must match your ID exactly. Fill in your date of birth (in YYYY-MM-DD form, for example 1994-03-12), nationality, personal email address, and phone number. Gender and marital status are optional - skipping them is fine and does not make your checklist incomplete.
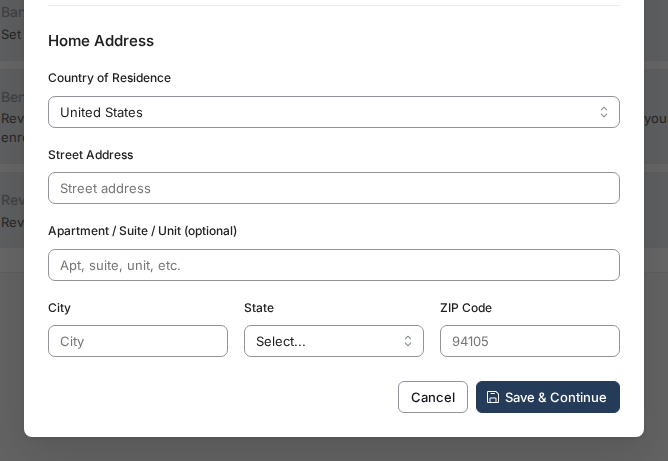
Step 7. Scroll down inside the same window to Home Address. Fill in your street address, city, state, and ZIP code, then select Save & Continue at the bottom. Success looks like the checklist showing "2 of 10 steps complete".
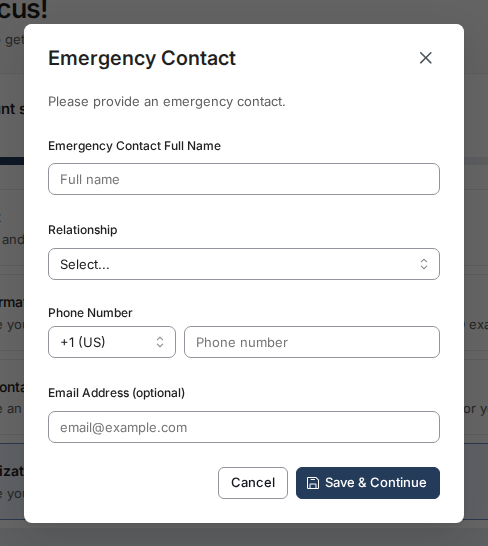
Step 8. The Emergency Contact window opens. Enter your contact's full name, choose their relationship to you from the list (Spouse, Partner, Parent, Sibling, Friend, or Other), and enter their phone number. Their email address is optional. Select Save & Continue. Success looks like "3 of 10 steps complete".
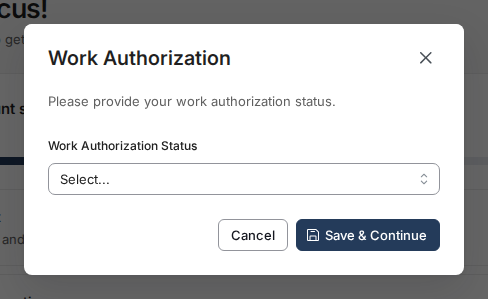
Step 9. The Work Authorization window opens with a single dropdown. Choose the option that matches your status - for example US Citizen, Permanent Resident (Green Card), or a work visa option. Select Save & Continue. Success looks like "4 of 10 steps complete".
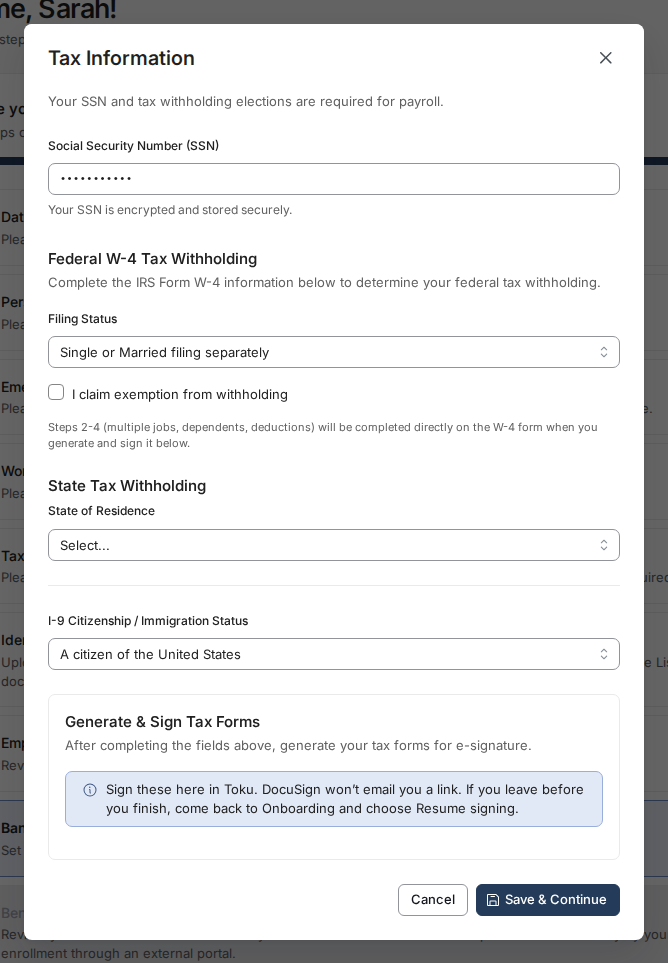
Step 10. The Tax Information window opens. Type your Social Security Number in the format XXX-XX-XXXX - it is encrypted, and after this step the platform only ever shows the last four digits. Choose your federal filing status, your state of residence for tax withholding, and your I-9 citizenship status (pre-filled as "A citizen of the United States" - change it if that is not you). Select Save & Continue. Success looks like "5 of 10 steps complete".
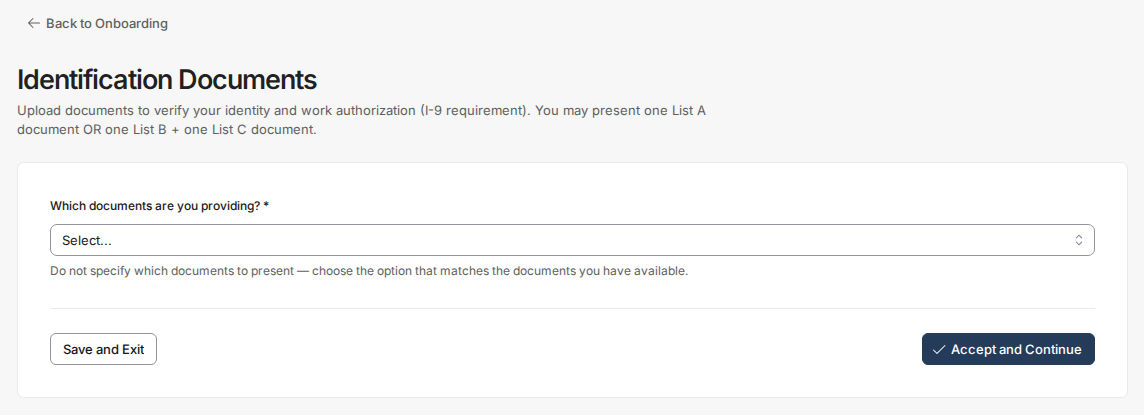
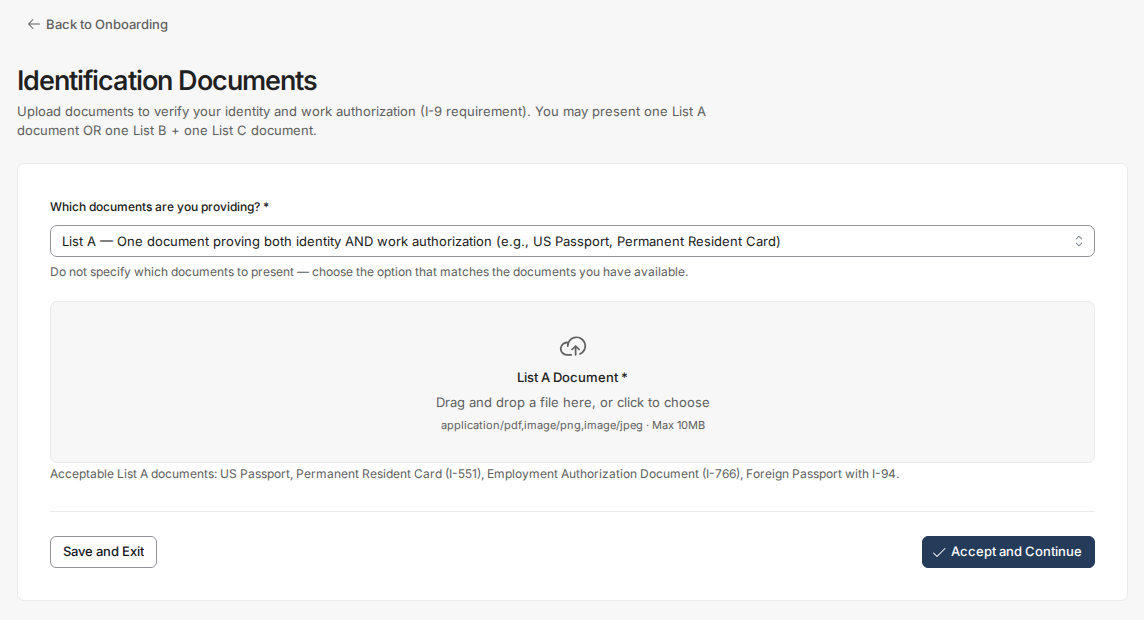
Step 11. The Identification Documents step opens as a full page rather than a small window. From the dropdown "Which documents are you providing?", choose List A if you have one document that proves both identity and work authorization (such as a US Passport), or List B + List C if you are providing two documents (such as a Driver's License plus a Social Security Card). Choose based on the documents you actually have - either choice is acceptable.
Step 12. An upload box appears for each required document. Select the box (or drag your file onto it) and choose a PDF, PNG, or JPEG under 10 MB. When the file name appears in green inside the box, the upload worked - select it again if you need to replace the file. Then select Accept and Continue. Success looks like the checklist showing "6 of 10 steps complete". If the file will not attach, check that it is one of the accepted types and under 10 MB.
The wizard now opens step 7 of 10, Employment Agreement. Follow the next section, Signing your agreement, then come back here for Banking & Payment.
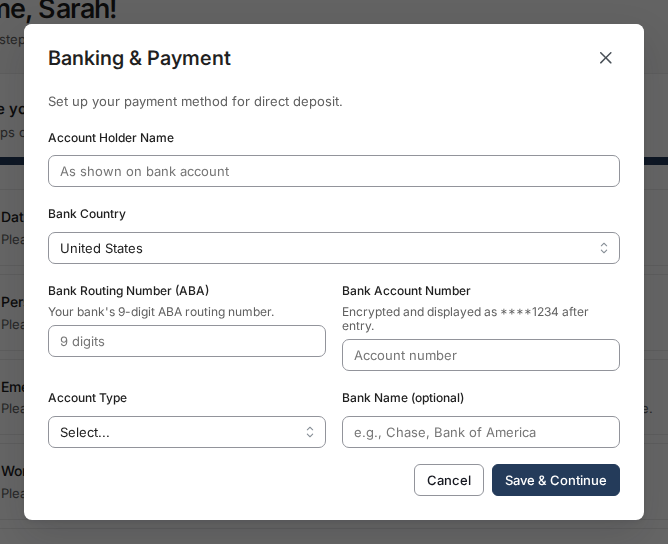
Step 13. The Banking & Payment window opens. Enter the account holder name exactly as it appears on your bank account, your bank's 9-digit routing number, and your account number (it is encrypted and shown as 1234 afterwards). Choose Checking or Savings. Bank name is optional. Select Save & Continue. Success looks like "8 of 10 steps complete".
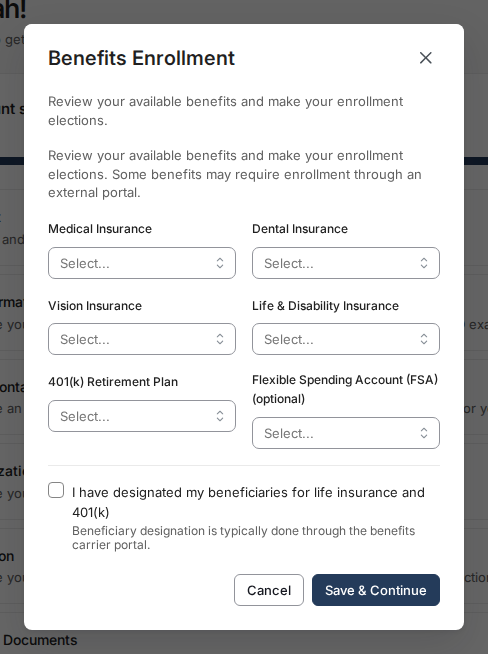
Step 14. The Benefits Enrollment window opens, if your organization offers benefits. For each benefit - Medical, Dental, Vision, Life & Disability, 401(k), and optionally an FSA - choose Enroll, Waive Coverage, or I need more information. Choosing "I need more information" does not block you; someone will follow up. Some benefits are completed later in an external carrier portal. Select Save & Continue. Success looks like "9 of 10 steps complete".
Signing your agreement
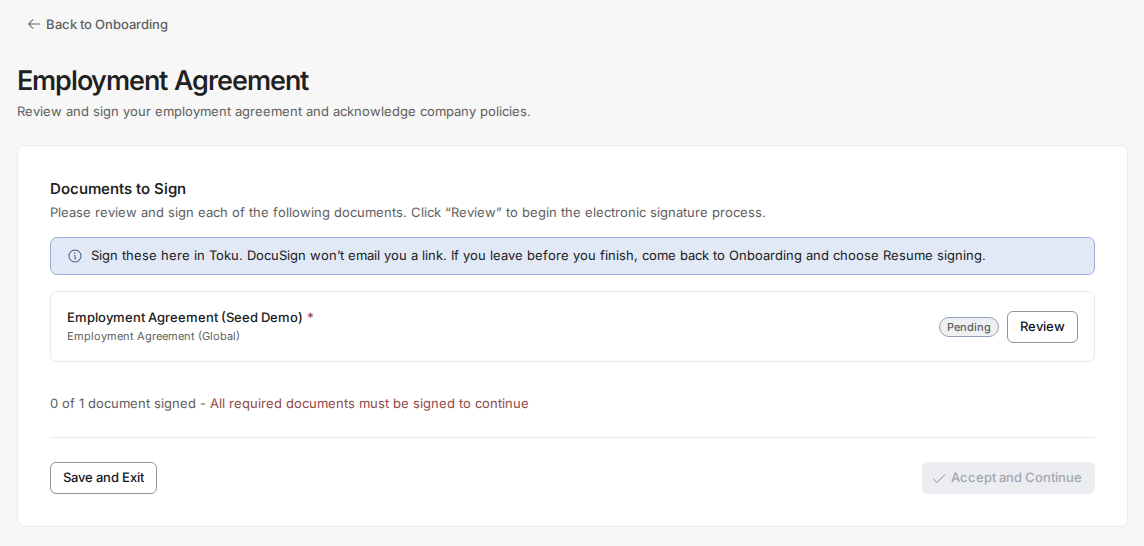
Step 1. When the Employment Agreement step opens (step 7 of 10), your agreement is listed under Documents to Sign. Select Review next to it to read and sign it right here in Toku through DocuSign, a secure electronic-signature service - DocuSign does not email you a link. If you leave before you finish, come back to Onboarding and choose Resume signing. If your agreement is not listed, contact your HR representative.
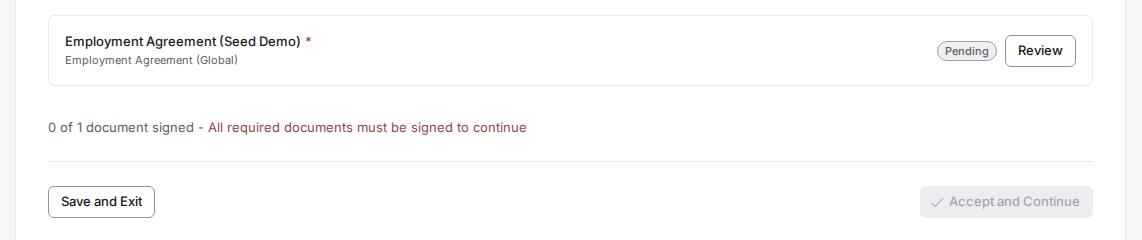
Step 2. When every required document (marked with *) is signed, select Accept and Continue (it stays greyed out until then - the page shows, for example, "0 of 1 document signed"). Success looks like the checklist showing "7 of 10 steps complete".
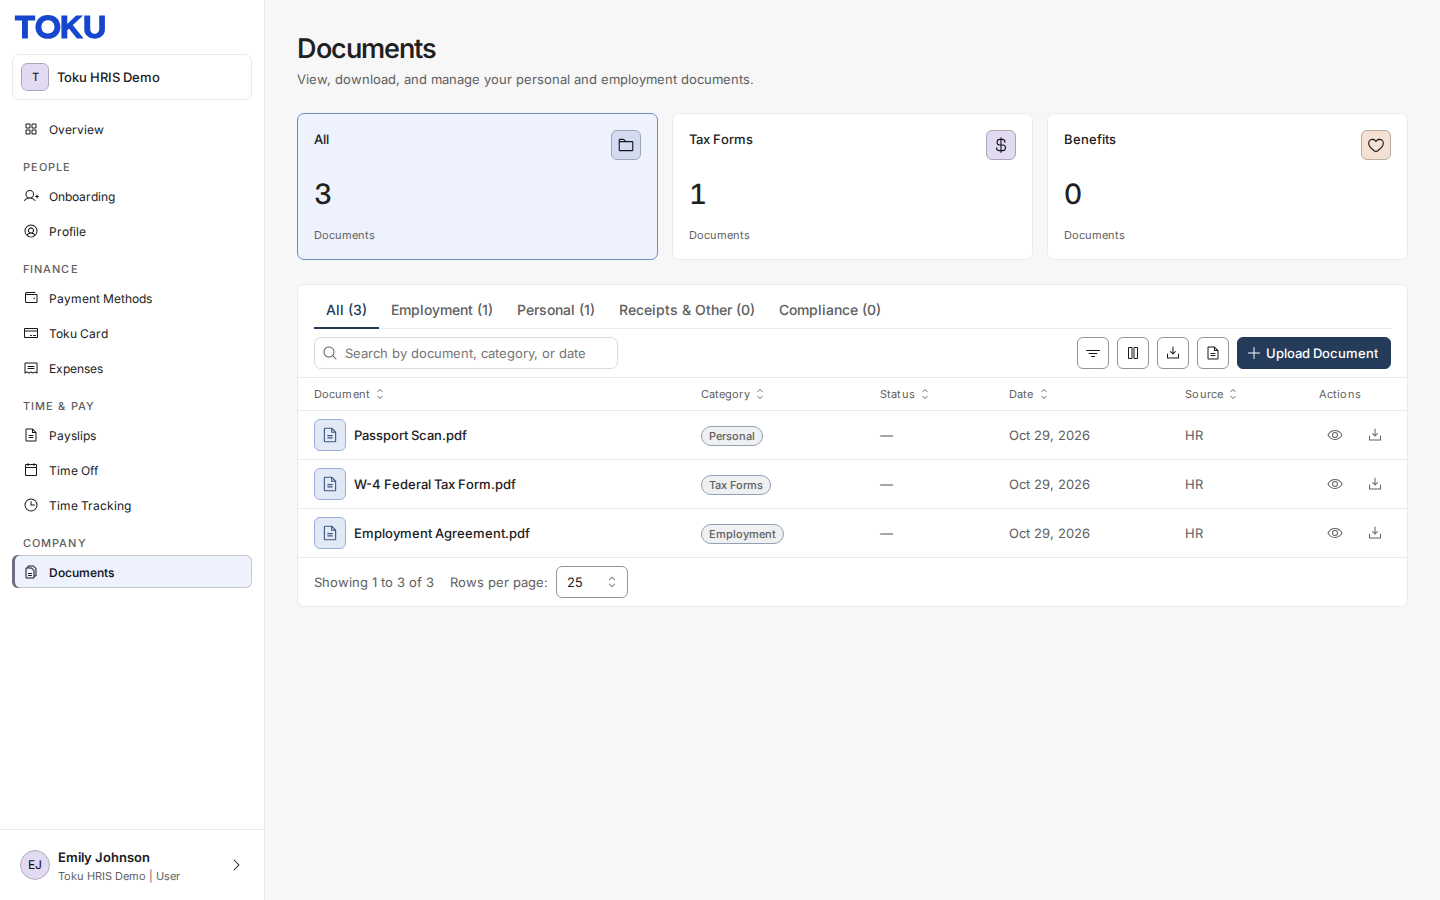
Step 3. After you sign, your organization countersigns too. The final, fully signed copy appears in the Documents section of the left-hand menu - not instantly. It can take days, because it arrives only after every party has signed. If you do not see it right away, nothing is wrong; check back later or ask your HR representative for status.
Submitting and what happens next
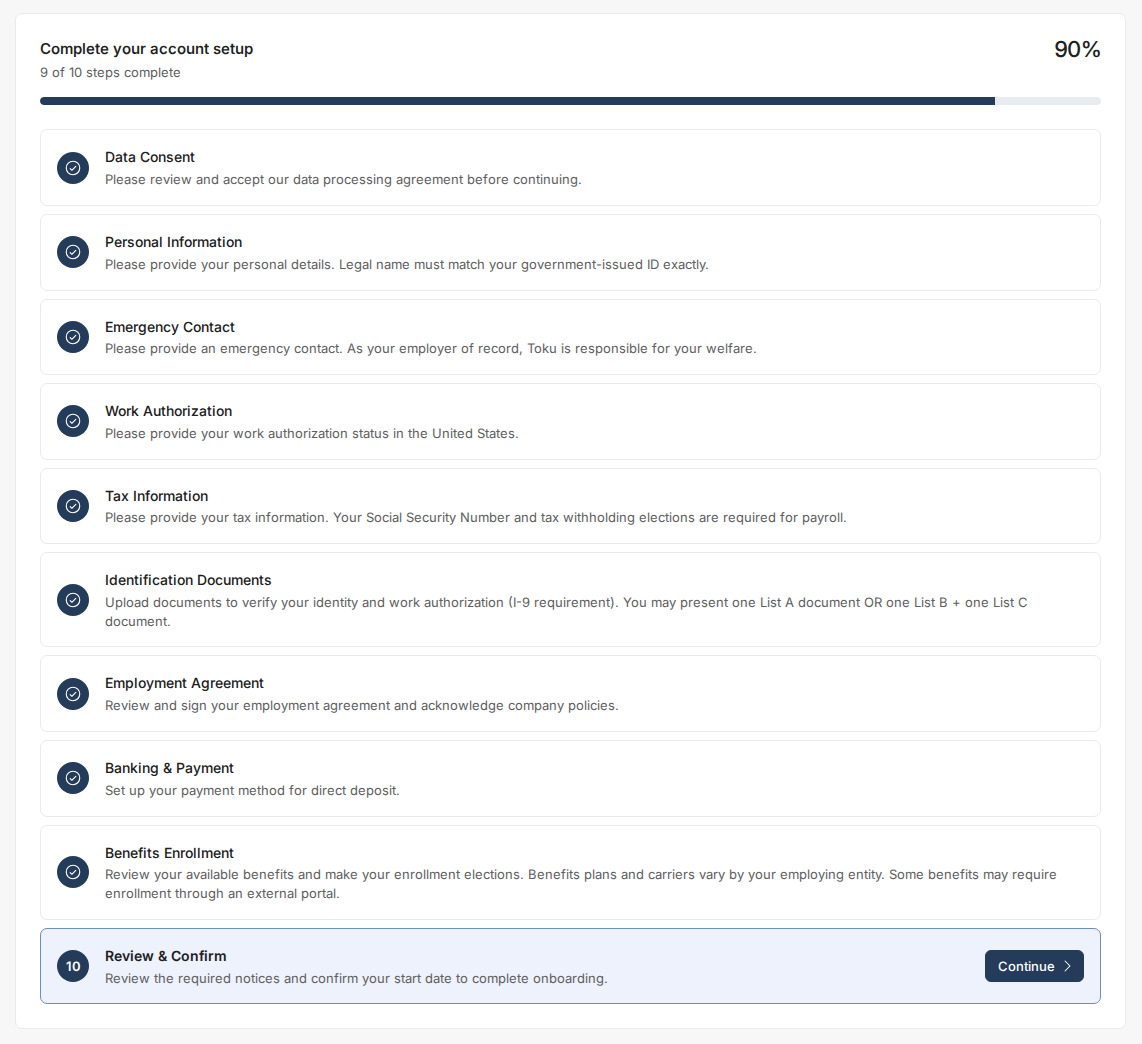
Step 1. Back on the checklist, every step you saved shows a blue check mark, and the bar reads "9 of 10 steps complete - 90%". This is what saved progress looks like: you can sign out and return any time without losing these steps. Optional fields you skipped (such as gender or middle name) do not hold the tracker back - only the 10 numbered steps count.
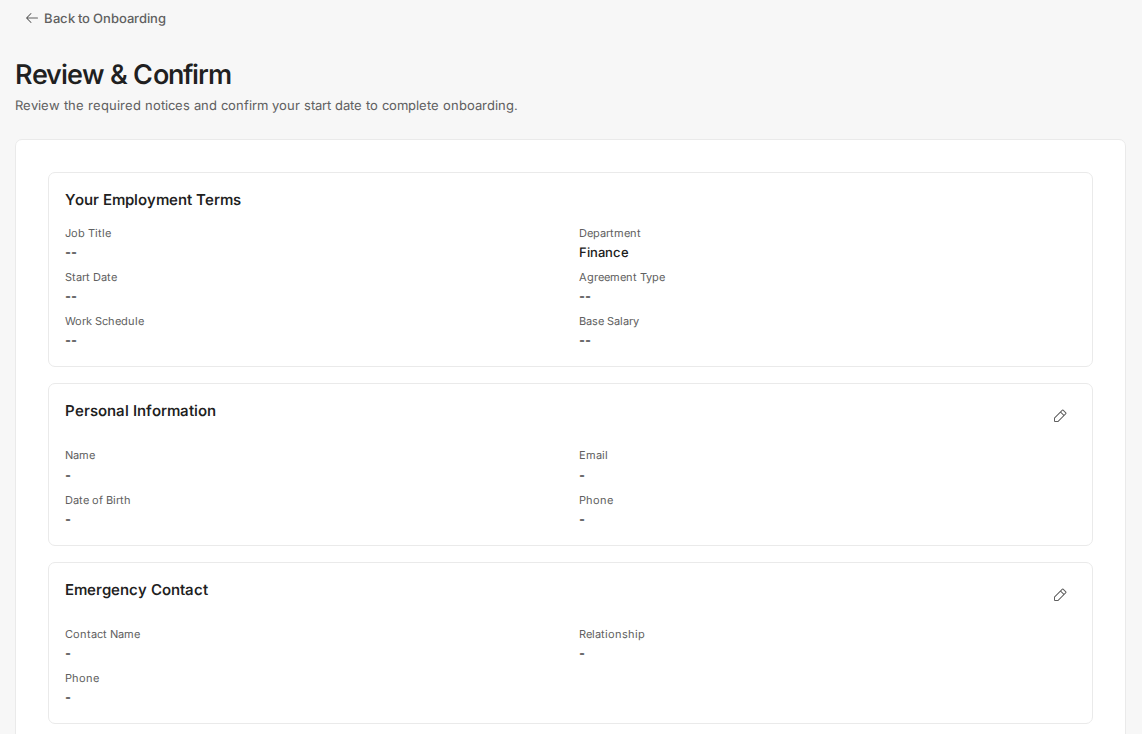
Step 2. Select Continue on the final step, Review & Confirm. It opens as a full page summarizing everything you entered - personal information, emergency contact, work authorization, tax details (with your SSN masked), and banking. Read each card. If anything is wrong, select the pencil (Edit) icon at the top right of that card to reopen the step and fix it.
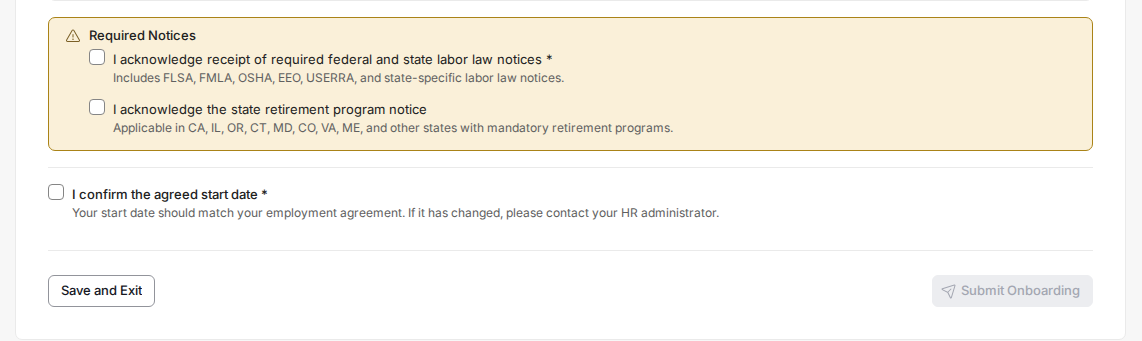
Step 3. Scroll to the bottom. Tick the required boxes under Required Notices (labor-law notices, plus any state-specific notices) and tick "I confirm the agreed start date". The Submit Onboarding button stays greyed out until every required box is ticked - if it looks disabled, an unticked required box above is the reason. When it turns blue, select Submit Onboarding. Your answers are sent to your organization and Toku for review and your part is finished.
What the statuses mean. Awaiting verification (the page you see after you submit) means your answers are with your organization and Toku for review - you do not need to do anything unless someone contacts you. Completed means the review is finished and your onboarding is fully closed out. You can use the platform sections in the left-hand menu (Overview, Documents, Time Off, and more) as soon as you can sign in; payroll-related pages such as Payslips fill in once your employment is fully active and your first payroll runs.
If a step will not accept your data
- A greyed-out button (Save & Continue, Accept and Continue, or Submit Onboarding) means a required field or box - marked with * - is empty, or (on Employment Agreement) a required document is not signed yet. Scroll up inside the step and complete it.
- Check formats. Date of birth must be YYYY-MM-DD. The SSN must be XXX-XX-XXXX. The routing number must be exactly 9 digits. Uploads must be PDF, PNG, or JPEG under 10 MB.
- Legal name rejected or pre-filled wrong? Your work email address and some employment details are set by your organization and cannot be edited here - the field help text says "Contact HR to update". Ask your HR contact to correct them.
- The page stops responding or you were signed out. Your session likely idled too long. Sign back in at
app.toku.com— completed steps are saved; re-enter only what you typed into the step that was open. - If a value you are certain is correct is still refused, stop and contact support with the details below rather than guessing.
Still stuck?
Contact your HR representative at your organization, or reply to your Toku welcome email, and include:
- Your full name and your organization's name.
- Which onboarding step you are on - use its exact title, for example "Tax Information" or "Identification Documents".
- Exactly what you typed or uploaded, and the message or behavior you saw instead of success.
- A screenshot of the whole screen, including the message. That detail lets the team reproduce the problem and unblock you in one round-trip.